When building a website with WordPress, you have the ability to customize both the look and functionality of your site as much (or as little) as you’d like. The idea is that using this open source content management system (CMS) will provide enough flexibility for virtually any type of website.
That’s a lot of potential power placed in your hands. Through the use of themes, plugins and even your own custom code, a WordPress site can be anything: a content hub; a marketplace; a community. If you have the right combination of tools and knowledge, you can make it happen.
For over 1 million websites, Advanced Custom Fields (ACF) has become one of the most trusted tools of the trade. And, while we’re thrilled by that number, we also know that there are many web professionals who haven’t yet tried ACF.
So today we’re going to introduce you to the basics of what ACF is and how it can help you build a better website. Let’s get started!
Content Designed Around Your Needs
Advanced Custom Fields is a WordPress plugin that helps you edit complicated content in a simple and logical way. If you’re familiar with WordPress but don’t have much experience with ACF, you may be wondering what all the fuss is about.
By default, the WordPress edit screen is somewhat limited in what it can do (although the upcoming Gutenberg editor looks to change that up a bit). It’s probably best used for a simple blog post with a title, thumbnail and content.
The WordPress visual editor does a good job at allowing rich content editing, but what drives web developers crazy is that the editor doesn’t handle more complicated situations very well. And there really isn’t a way to avoid the potential that a client or colleague will inadvertently break your carefully crafted formatting.
ACF allows you, the developer, to take full control of the WordPress edit screen and tailor the content editing experience around your website’s needs! Using ACF, you can add fields in addition to the WordPress visual editor or choose to hide it completely. Plus, you have a wide array of field types to choose from including text, media, choice, layout and more! Each field can be added, edited or arranged to your liking.
A Real-World Example
Suppose you are building a website for a client and are given the following design for the home page.

Image credit: Mond – Creative Multipurpose WordPress Theme
The client would like to periodically make changes to their home page. Specifically, they’ll want to change the full-width “hero” image and the text that goes with it.
Knowing this, we can think about the best way to implement this feature. To do that, let’s list some basic goals:
- Enable our client to easily swap out the hero image with a new one.
- Allow the text layered over top of the image to be editable.
- Avoid anything that could break formatting.
Now that we have set our goals, it’s time to create our plan of attack. Let’s take a look at our options:
WordPress Visual Editor
This is the default way to add content in WordPress, but it’s going to take a leap of faith to make this particular feature work. The hero image and text can be entered into the home page through the editor easily enough. But we’ll have to add some CSS classes to the content that will enable things to look the way we want on the front end. It can be done, but there are some problems with this approach:
- The visual editor is incredibly sensitive when it comes to adding CSS classes. For example, if our client hits the backspace key one too many times when trying to replace text, they could inadvertently delete the class from our code. The result is a broken layout. 😱
- If someone new comes in to try and make changes, they may not even know about the rules of engagement. Again, there is potential for our formatting to be lost. 🙈
In short, using the WordPress visual editor leaves too much room for something to go wrong with our editable hero image. This approach depends on our client having to remember extra steps to keep the formatting from going haywire. It’s not a viable solution for the long term.
The ACF Approach
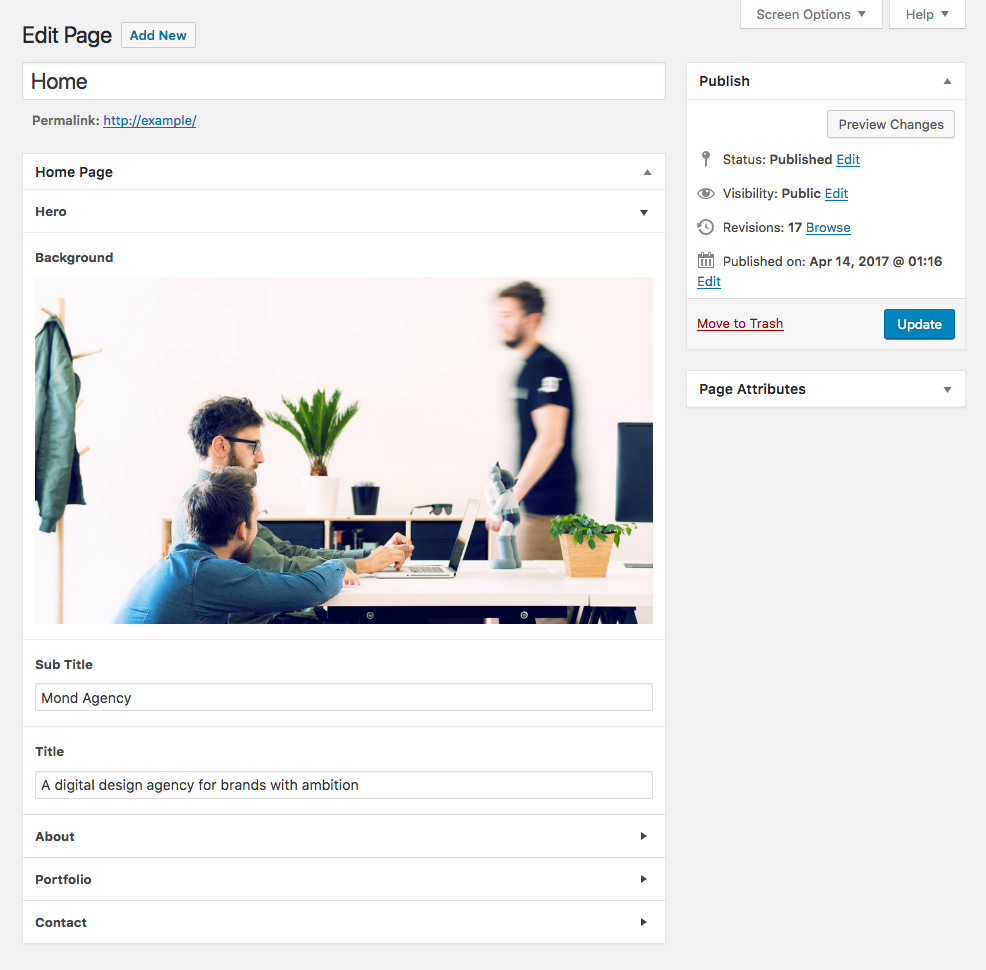
Using ACF, we can create specific fields that our client can use to safely edit the hero image and text. This gives us the ability to control virtually every aspect of the process. Here is an example to show what we mean:

Example edit screen using ACF. Accordion fields have been used to segment the editing workflow.
With this new edit screen, we can:
- Provide simple and intuitive editing areas for the individual content elements.
- Control the file size, type and dimensions of the image uploaded to avoid “client mistakes”.
- Edit our theme template’s HTML to place our image and text exactly the way we want.
This ensures that our carefully-crafted layout stays intact while also providing our client with the freedom to make changes.
What’s more, we’ve also created a more intuitive UI inside of WordPress for our client. Instead of having everything inside of a single WYSIWYG editor, each editable piece of content can be separated out into its own field. Each field has its own label and you can also add instructions. This simplifies the process and leaves no doubt in our client’s mind as to how things work.
A Simple and Worry-Free Setup
On the front end of our site, we can create the perfect hero image layout using the data from our custom fields. In this case, we’ll add the following code to our home page template:
page-home.php

<div id="hero">

    <div class="container">
        <h2><?php the_field('sub_title'); ?></h2>
        <h1><?php the_field('title'); ?></h1>
    </div>

    <?php

    $image = get_field('background');

    if( $image ): ?>
    <style type="text/css">
        hero {
            background-image: url(<?php echo $image['url']; ?>);
        }
    </style>
    <?php endif; ?>

</div>
Combine it with some CSS and you have a stunning layout. The great thing is that this setup requires no extra maintenance on your part. Once you have your fields and layout added to your template – it simply works. Whenever our client decides to make changes, they’re reflected on the front end without any additional work. The results stay professional while the ease-of-use for our client has been dramatically upgraded.
Check out Getting Started with ACF to learn the ins and outs of using the plugin.
Building Upon Your Foundation With ACF
The example above is meant to demonstrate how ACF can solve common problems that WordPress developers face. What we were able to achieve with our “Hero area” was twofold:
- Ensure that our client doesn’t have to remember anything about editing the home page.
- Ensure that the home page design is protected from accidental formatting mistakes.
In a nutshell, this is what ACF excels at. But this example is really just the beginning. We can use ACF for anything from augmenting content (as we did above) or building a completely custom UI to handle specific and complex types of content.
What’s more, using ACF Pro enables even more advanced possibilities – like the ability to create repeatable content that will dynamically display on your site. Once you have mastered the very basics of Advanced Custom Fields, you’ll start imagining all kinds of different ways that it can help you build a better WordPress website.


