Key points:
- Learn the fundamentals of WordPress custom post types (CPTs).
- Compare manual coding vs. ACF plugin approaches for implementing CPTs.
- Master ACF’s visual development tools for creating and managing complex content structures.
- Discover advanced CPT features, including custom taxonomies, field types, and front-end display options.
- Explore real-world implementation examples using a practical “Cars” post type demonstration.
- Gain insights into professional WordPress development workflows and best practices.
WordPress powers over 43% of the web, a staggering testament to its versatility. But for all its dominance, the platform’s default content types – posts and pages – can feel limiting when tackling modern web projects. Enter custom post types (CPTs), the feature that transforms WordPress from a simple blogging tool into a content management system more befitting of its stature.
Whether showcasing a portfolio, managing real estate listings, or curating a product catalog, CPTs allow you to tailor content structures to your needs.
The good news is that creating CPTs isn’t rocket science. You can roll up your sleeves and dive into the code for full control or opt for a plugin to simplify the process. Both methods have their merits and trade-offs.
In this guide, we’ll demystify the process of building CPTs, enabling you to decide which path best aligns with your technical skills and project goals. Let’s get started.
Understanding WordPress custom post types
In WordPress, “post types” refer to the different categories of content you can create and manage. The platform comes with several built-in options, including:
- Posts: The backbone of blogs and news sites, these are time-stamped entries that often get displayed in reverse chronological order.
- Pages: Static, timeless content like About Us or Contact pages, separate from the blog flow.
- Attachments: Media files like images or PDFs, each with its own metadata.
- Revisions: A history of changes to your content, useful for tracking edits and restoring previous versions.
- Navigation menu items: Entries that build the menus for your site, linking to posts, pages, or external URLs.
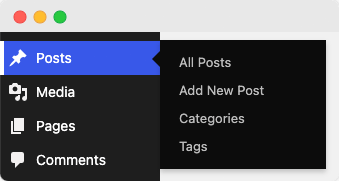
While these built-ins are versatile, they often fall short when handling diverse or specialized content needs. Custom post types enable developers and site owners to craft specific content structures tailored to unique requirements, moving WordPress beyond its default setup.
Imagine a restaurant website. Instead of shoehorning a menu into standard posts, you could create a Menu Items CPT with fields for prices, ingredients, and dietary labels. This approach keeps your menu separate, organized, and easy to manage.
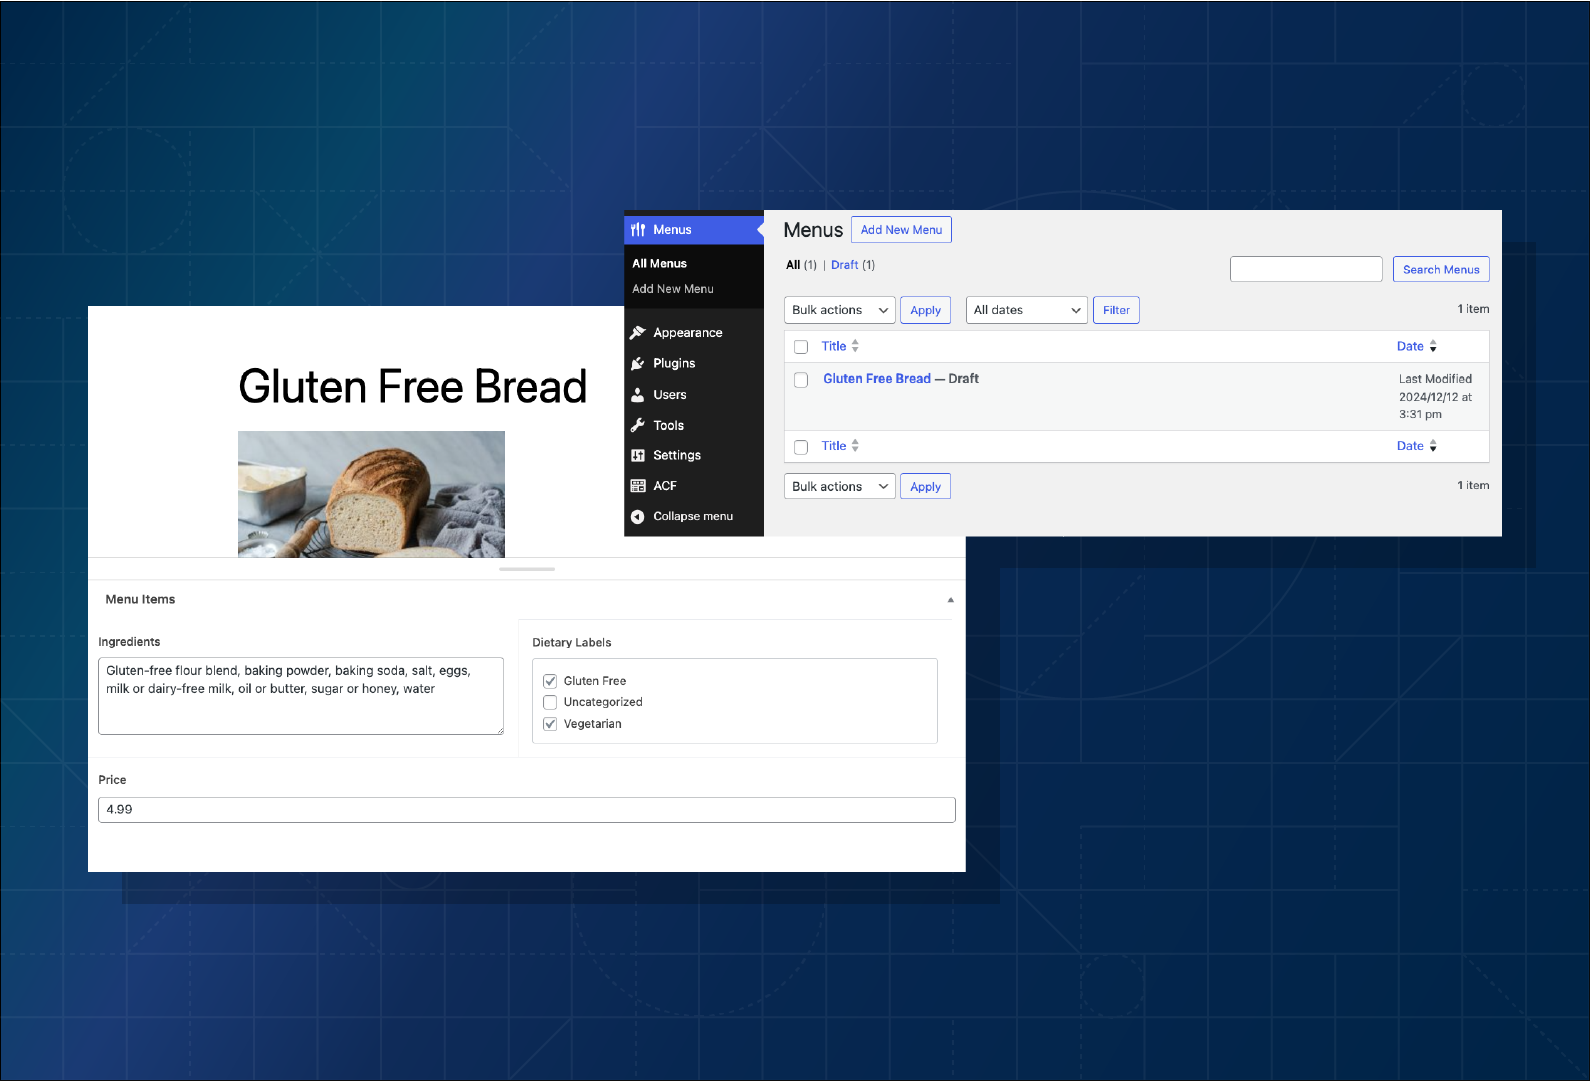
Some other real-world uses of CPTs include:
- eCommerce platforms can use a Products CPT to easily manage pricing, SKU, stock status, and product variations.
- Real estate listings can benefit from a Properties CPT to showcase details like price, location, square footage, and property type.
- Event managers can streamline their operations with an Events CPT to handle dates, times, locations, and ticket availability.
For developers and site owners, the advantages are clear. CPTs allow them to:
- Improve content organization by keeping different content types isolated for better clarity and usability.
- Create custom fields and taxonomies to add detailed metadata or categorize content uniquely.
- Tailor the admin interfaces to streamline management for editors and admins.
- Control how and where content appears on your site.
Manual vs. plugin: Two approaches to creating custom post types
When creating custom post types in WordPress, you have two main options: write the code yourself or let a plugin do the heavy lifting.
The manual approach is for those who like to get under the hood. By adding code – traditionally to your (child) theme’s functions.php file – you can customize every detail of your CPT. From naming conventions to taxonomies, the sky’s the limit.
But here’s the downside: tying CPTs to your theme means losing them when you switch themes. A smarter alternative is using a Must-Use (MU) plugin, which is a persistent site-level solution that keeps your CPTs intact no matter what theme you’re using.
While manual coding offers total control, it demands time, precision, and technical know-how.
However, the plugin approach is all about speed and simplicity. Plugins like Advanced Custom Fields (ACF®) provide a visual interface to create CPTs without touching a line of code, making it accessible even for non-developers. It’s faster, less error-prone, and can handle complex content structures when combined with advanced tools like the ones in ACF.
In fact, ACF takes it a step further by allowing you to create CPTs through a simple, intuitive interface and then export the generated code for use anywhere – no plugin dependency. It’s the perfect blend of convenience and control.
Here’s a handy table comparing the two approaches:
| Feature/Consideration | Plugin method (ACF) | Manual coding |
| Development speed | Fast – visual interface. | Slower – requires custom coding. |
| Technical expertise required | Intermediate WordPress knowledge. | Advanced PHP and WordPress development. |
| Maintenance | Automatic updates via plugin. | Manual updates and maintenance. |
| Customization | High flexibility with the built-in toolset. | Virtually unlimited customization options. |
| Cost | CPTs are a feature of the free ACF plugin (users can upgrade to PRO from $49+). | Free (development time only). |
| Client handover | User-friendly interface. | Likely requires technical documentation. |
| Performance impact | Minimal overhead. | Potentially lighter weight. |
1. Building custom post types with ACF for streamlined development
Setting up custom post types in WordPress with ACF is straightforward. In fact, our 2024 Annual Survey shows that more than a quarter of users turn to ACF for exactly this.
In this walkthrough, we’re building a “Cars” post type to handle key details like price and miles per gallon (MPG):
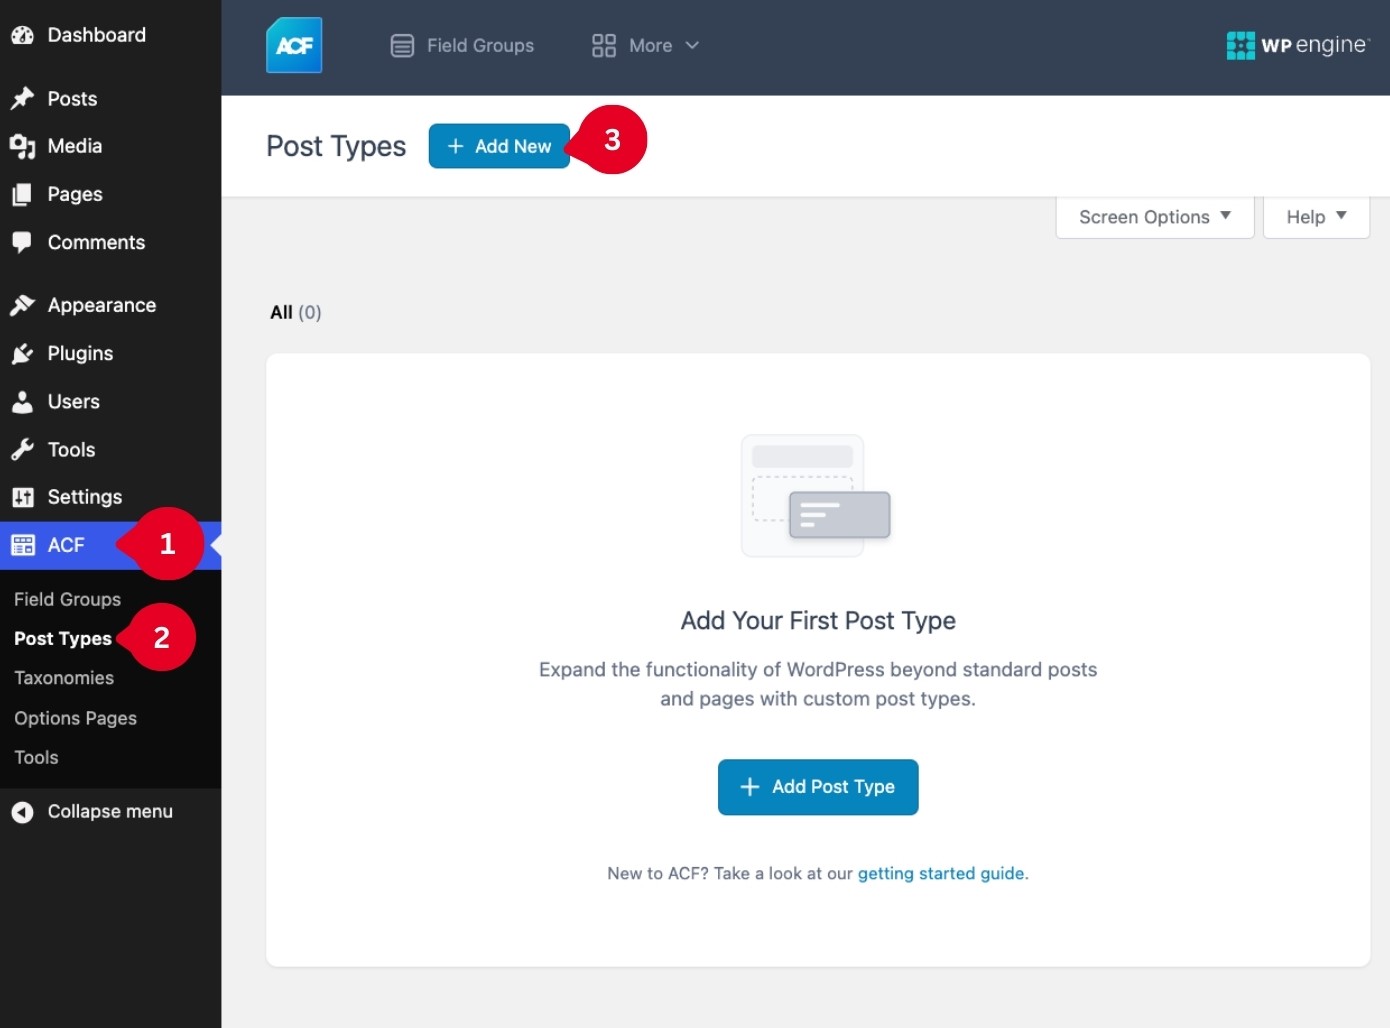
1. From your admin dashboard, go to ACF > Post Types, then click Add New.
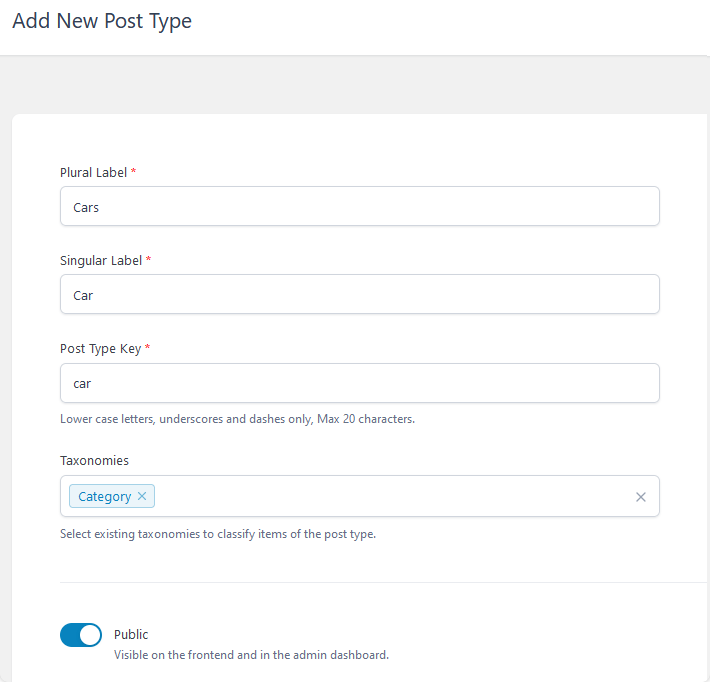
2. Fill in the details in the sections that show up as needed. The Post Type Key value should automatically populate, and we recommend using the suggested value.
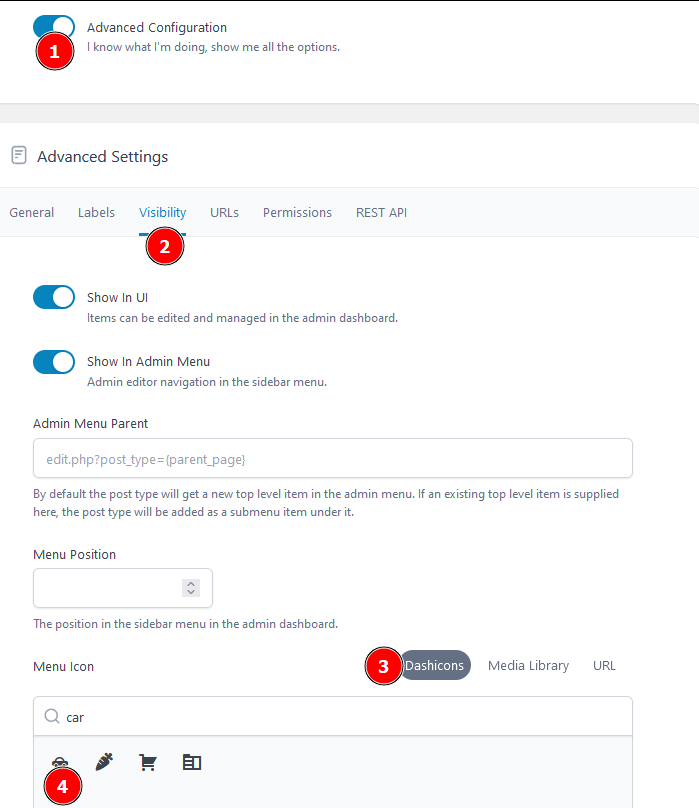
💡 Optionally, you can scroll down and toggle the Advanced Configuration section on, then switch to the Visibility tab and choose a Menu Icon from the Dashicons section.
3. Create a custom field group where you’ll be able to capture various details about each car. From the dashboard, go to ACF > Field Groups > Add New.
4. Name the field group Vehicle details and add fields for basic information such as price, mileage, and MPG.
5. Under the Location Rules of the Settings section, change the Rules to show the field if Post Type + is equal to + Car. This ties the field group to the Car post type so they won’t accidentally display anywhere else.

6. When you’re satisfied, save your changes.
7. We’ll need to create a template to display the Car post type on the frontend. To do this, create a file called single-car.php in your child theme folder (wp-content/themes/your-child-theme) and add the following code to it:
<?php
get_header(); // Includes the header.

if (have_posts()) :
    while (have_posts()) : the_post(); // Start the loop for the current Car post.
        ?>
        <div style="text-align: center; max-width: 800px; margin: 0 auto;">
            <h1><?php the_title(); ?></h1> <!-- Displays the Car title. -->

            <!-- Displays the featured image -->
            <?php if (has_post_thumbnail()) : ?>
                <div>
                    <?php the_post_thumbnail('medium'); ?> <!-- Adjust 'medium' to your preferred image size. -->
                </div>
            <?php endif; ?>

            <!-- Outputs the custom fields -->
            <p>Price: $<?php the_field('price'); ?></p>
            <p>Mileage: <?php the_field('mileage'); ?> miles</p>
            <p>MPG: <?php the_field('miles_per_gallon'); ?></p>
        </div>
        <?php
    endwhile;
endif;

get_footer(); // Includes the footer.
?>
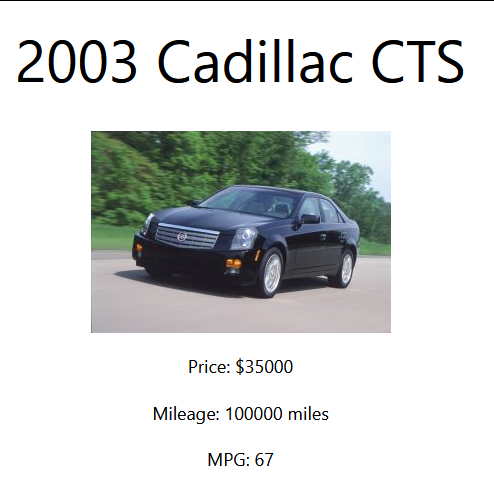
Now you can create a new car from the dashboard via Cars > Add New Car, and when you publish the post, it should look something like this:
Sure, you can leave it as is, but there’s so much more you can do.
The inline styles we used above get the job done, but they’re not exactly winning any awards. If you want to do it right, move those styles into a proper style.css file in your child theme folder. It’s more organized and, honestly, way more respectable when someone else takes a peek at your code.
This template shows the basics, but ACF’s flexibility means you’re not stuck with this setup. You could display your car data using ACF Blocks (part of ACF PRO) instead – perfect if you want editors to have more control over the layout. Or integrate it with WooCommerce to handle car sales! Or many other options! Let’s explore those next.
Creating custom post types in WordPress with ACF PRO
If you’ve been using the free version of ACF to add some basic custom fields to your post types, you’ve already taken a big step toward customizing WordPress for your needs.
But as you scale up and start managing more complex content, you’ll quickly find that basic custom fields alone don’t cut it.
ACF PRO unlocks tools that let you build in-depth and flexible content structures for your custom post types. Here’s what you get with the upgrade:
- Enhanced field options: Repeater fields are a lifesaver when you need multiple instances of a field group. For example, a Team Members CPT can include repeatable sections for each member’s social media links, streamlining the process while keeping things neatly organized.
- Flexible content management: The Flexible Content field offers unmatched layout control. Say you’re working on a Projects CPT – ACF Pro lets you create different templates for web design projects vs. logo design projects, making your CPTs both versatile and user-friendly.
- Advanced data organization: Options Pages allow you to manage global settings, like shared filters for a Portfolio CPT. This centralizes your data and simplifies site-wide consistency.
- Media management: With the Gallery Field, managing image collections becomes effortless – ideal for Portfolio or Products CPTs.
- Field reusability: The Clone field lets you reuse field configurations across multiple CPTs, ensuring consistency while saving development time.
- Block editor integration: ACF Blocks allow you to design custom Gutenberg blocks tailored to specific CPTs, elevating your content presentation.
Sure, the PRO license has a cost, but the development hours it saves more than justifies the expense, even for experienced developers. It dominates the space with millions of active installs, eclipsing competitors like Custom Post Type UI at just over 1,000,000, Meta Box at 700,000, and Pods at 100,000.
Supercharge Your Website With Premium Features Using ACF PRO
Speed up your workflow and unlock features to better develop websites using ACF Blocks and Options Pages, with the Flexible Content, Repeater, Clone, Gallery Fields & More.
2. Manually creating custom post types with code
Alternatively, you can create custom post types manually. This method gives developers full control over functionality and behavior but requires advanced coding knowledge and time investment.
If you’re willing to take this route, add the following code in your child theme’s functions.php file:
function register_car_post_type() {
    // Define the labels for the custom post type. These labels appear in the WordPress admin dashboard.
    $labels = array(
        'name' => 'Cars', // The plural name of the post type.
        'singular_name' => 'Car', // The singular name of the post type.
        'add_new' => 'Add New Car', // Text for the "Add New" button.
        'add_new_item' => 'Add New Car', // Text for the "Add New Car" page heading.
        'edit_item' => 'Edit Car', // Text for the "Edit Car" page heading.
        'new_item' => 'New Car', // Text for a new car item.
        'view_item' => 'View Car', // Text for the "View Car" link.
        'search_items' => 'Search Cars', // Text for the search bar in the admin.
        'not_found' => 'No cars found', // Message displayed when no cars are found.
        'not_found_in_trash' => 'No cars found in trash', // Message displayed when no cars are in the trash.
        'all_items' => 'All Cars', // Text for the "All Cars" link in the admin menu.
        'menu_name' => 'Cars', // The name displayed in the admin menu.
        'name_admin_bar' => 'Car', // The name displayed in the WordPress admin toolbar.
    );

    // Define the settings (arguments) for the custom post type.
    $args = array(
        'labels' => $labels, // Use the labels defined above.
        'public' => true, // Makes the custom post type publicly accessible.
        'has_archive' => true, // Enables an archive page for this post type.
        'menu_icon' => 'dashicons-car', // Sets the menu icon in the admin dashboard (Dashicons class).
        'supports' => array('title', 'editor', 'thumbnail'), // Enables support for the title, editor, and featured image.
        'show_in_rest' => true, // Enables support for the Gutenberg editor and REST API.
    );

    // Register the custom post type using the provided settings.
    register_post_type('car', $args);
}

// Hook the custom post type registration function to the 'init' action, so it runs when WordPress initializes.
add_action('init', 'register_car_post_type');
Save the file and reload your admin dashboard, where the post type should appear on the left.
This process can take around thirty minutes for someone familiar with PHP and WordPress, but misconfigurations (e.g., incorrect arguments or labels) can cause errors or inconsistent behavior.
Unlike ACF, whose UI clearly explains each setting, the WordPress register_post_type function lacks intuitive documentation and requires a deeper understanding of its parameters.
Moreover, this massive wall of code only creates one CPT, and that’s before you get into the accompanying field groups and field types, and displaying the content on the frontend.
The manual method gives you full control, sure – but it’s the kind of control you have over a hand-drawn map you sketched yourself when GPS is right there.
Just use ACF. Future you will be high-fiving present you in no time.
Transform your WordPress site with ACF’s custom post types
Whether you’re crafting a sleek portfolio or managing a sprawling car sales platform, you need custom post types for specialized content in WordPress. They offer the structure and flexibility needed to elevate your site beyond the basics.
While manual coding gives developers full control over niche requirements, ACF strikes the perfect balance between power and ease of use, making it the go-to tool for developers and agencies alike.
ACF continues to set the standard for professional WordPress development. Its extensive field types, intuitive interface, and developer-friendly features streamline the entire process, allowing you to focus on delivering high-quality solutions without the technical overhead.
Ready to transform how you manage CPTs? ACF PRO starts at just $49 – invest in efficiency, scalability, and a better development experience today.



For plugin support, please contact our support team directly, as comments aren't actively monitored.