Introduction
The WordPress block editor has revolutionized the way we can create content in WordPress. Whether you’re developing a custom ACF Block, a theme, or a plugin, effective tooling can help make your development workflows faster.
While ACF Blocks do not require any tooling or building, the default create-blockpackage uses @wordpress/scripts to handle compilation of scripts and styles. But when you have multiple blocks, it makes more sense to create a custom workflow to compile all your blocks at once. Also, more modern features like the WordPress Interactivity API do require you to include a module and have a build script for your block.
In this tutorial, we’ll delve into the essential @wordpress/scripts package, before showing how to create a multiple ACF Blocks workflow. We focus on three key commands from @wordpress/scripts: build, start, and build:copy-php. These commands are the foundation of your block editor project’s development workflow using ACF Blocks.
Understanding @wordpress/scripts
The @wordpress/scripts package streamlines the development process, simplifying setup and management of build configurations for your ACF Blocks.
We’ll look at some of the most basic commands you can take advantage of, and then show how to utilize @wordpress/scripts for a multiple ACF Block project.
To utilize @wordpress/scripts, you must have the package installed as a dependency in your project:
npm install @wordpress/scripts --save-dev
Installing @wordpress/scripts will add a package.json file to the root of the directory if one does not already exist. Once the file has been created, commands can be added in the scripts definitions. This is where you will add the build and start commands:
{
    "scripts": {
    "build": "wp-scripts build",
    "start": "wp-scripts start"
    }
}
Let’s take a look at what each of these does.
The Build Command
npm run build
Once the build command completes, your project’s production-ready assets will be available in the build directory. This creates a production build with compressed code that’s faster to download and can include third party modules for you to use, but the resulting files are harder to read and debug.
The Start Command
npm run start
The start command sets up a local development environment with hot module replacement (HMR) for real-time changes. Once the start command has been executed successfully, your project is now served locally, and any changes you make will trigger HMR, providing a seamless and efficient development experience.
You can use either of these commands to start your project. In many cases, you’ll want to use npm run start during development to watch for changes, and npm run build when it’s production ready.
Multiple ACF Block Implementation
Now that we have a foundational understanding of some of the basic script commands that @wordpress/scripts has to offer, let’s build off these by creating a multiple ACF Block plugin project.
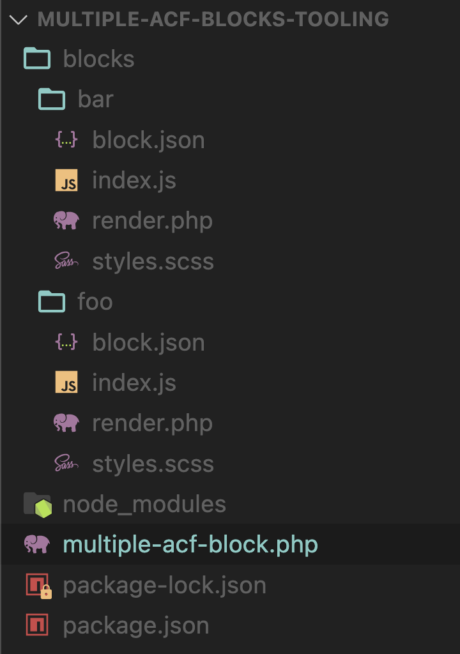
First, we need to add some new file structure to our WordPress plugin. The following screenshot shows the directory structure we will create.

├── MULTIPLE-ACF-BLOCKS-TOOLING
├── blocks
├── bar
├── blocks.json
├── index.js
├── render.php
└── styles.scss
            ├── foo
                ├── blocks.json
├── index.js
├── render.php
└── styles.scss
├── node_modules
├── multiple-acf-block.php
├── package_lock.json
└── package.json
To get started, first create the root directory in your plugins folder with a blocks directory inside. After you create the two directories, run npm install @wordpress/scripts --save-dev from the root directory of the plugin to install the needed packages and initialize your package.json file.
There will need to be two directories under blocks, named bar and foo. These are the blocks we’ll create, and each will need the following files to register and render the block:
blocks.jsonindex.jsrender.phpstyles.scss
You can run touch blocks/foo/<file> to create the blank files as placeholders. Do this for all the needed files.
Adding Scripts to package.json
Now that we have our new file structure in place, let’s configure our package.json file.
In the scripts property inside your package.json, add the build and start commands. Your package.json should look like the following:
{
  "devDependencies": {
    "@wordpress/scripts": "^28"
  },
  "scripts": {
        "build": "wp-scripts build --webpack-src-dir=blocks --webpack-copy-php",
        "start": "wp-scripts start --webpack-src-dir=blocks --webpack-copy-php"
  }
}
The --webpack-src-dir=blocks tag tells webpack to find the entry point for your project by scanning all script fields in block.json files in the ./blocks directory. The fallback entry point is src/index.js (other supported extensions: .jsx, .ts, and .tsx) if no block.json file is found.
The --webpack-copy-php part of the script tells webpack to copy over PHP files it finds to our build output folder. This enables copying all PHP files from the source directory and its subfolders to the output directory.
Adding Configuration to Block Files
The next step is to add our configuration to the block.json file in bar, which sets up where to look for our script file, file:./index.js. We’ll also configure index.js to import our SCSS file, styles.scss. All this is done by wp-scripts default webpack configuration.
Add the following to the bar folder’s block.json file:
{
    "apiVersion": 2,
    "name": "mutiple-acf-blocks/bar",
    "version": "0.1.0",
    "title": "Bar",
    "description": "A test acf block bar",
    "script": "file:./index.js",
    "acf": {
        "mode": "preview",
        "renderTemplate": "render.php"
    }
}
Add the following to your index.js in the bar folder:
import './styles.scss';

console.log(Hello from Bar's JavaScript);
Because wp-scripts uses webpack and supports CSS, it will automatically create the correctly compiled style.css file for us if we import a Sass file in our JavaScript.
Finally, let’s add some styling to our styles.scss file:
.bar {
    color: red;
}
Let’s try running the build command and see what output we get within our build directory, and then we’ll discuss how this all gets wired up.
npm run build
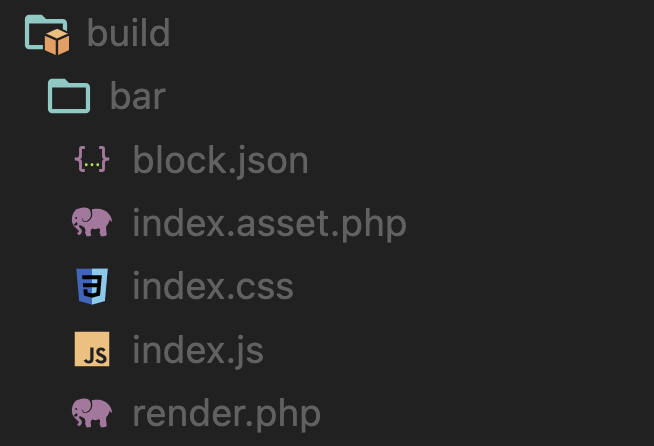
If the command completed successfully, you should see the following in your build directory :

├── build
├── bar
├── blocks.json
├── index.asset.php
├── index.css
├── index.js
└── render.php
Repeat the process for the foo block, then run npm run build. You should now see in the build folder both a foo and bar directory with the same files inside.
Registering your built blocks
Your last step is adding the following PHP in the multiple-acf-block.php file at the root of your plugin to utilize the register_block_type() function to register the blocks in your build directory.
<?php
/**
 * Multiple ACF Blocks Tooling
 *
 * @package           Multiple ACF Blocks Tooling
 * @author            you
 *
 * @wordpress-plugin
 * Plugin Name:       Multiple ACF Blocks Tooling
 * Plugin URI:        https://www.website.com
 * Description:       An example Multiple ACF Block plugin.
 * Version:           1.0.0
 * Author:            you
 * Author URI:        https://www.website.com
 * Update URI:        https://www.website.com
 * Requires PHP:      7.4
 * Requires at least: 5.8
 */

add_action( 'init', 'register_multiple_acf_blocks' );
function register_multiple_acf_blocks() {
    register_block_type( __DIR__ . '/build/bar' );
    register_block_type( __DIR__ . '/build/foo' );
}
After adding this code, go to the plugins screen in the WordPress admin and activate your finished plugin. If all is successful, you should be able to add a foo and bar block in the block editor. Adding each should trigger a console log as defined in your index.js file for each block.
Wrapping Up
It takes time to create a custom workflow, but it’s nothing compared to the time you can save by compiling multiple ACF Blocks at once. The process boils down to installing @wordpress/scripts in the project’s root, adding script commands for start and build, and then extending these base commands with tags that tell wp-scripts where our entry point starts. Once that’s done, webpack handles the rest, scanning our block.json configuration, parsing what script files need to be included, and compiling it all in our build folder.
We’ve concentrated here on compiling the blocks, but there’s even more you can add to your ACF Blocks with @wordpress/wp-scripts, such as linting options to enforce code formatting, and packages-update to update the project’s WordPress packages to the latest version. You can even change how @wordpress/scripts utilizes webpack by creating your own webpack configuration.
How do you use wp-scripts with your ACF Blocks? Let us know on Twitter.
