Overview
ACF PRO can be installed using Composer. Please see Installing ACF With Composer for details on installing the free ACF plugin with Composer.
Generate API Credentials
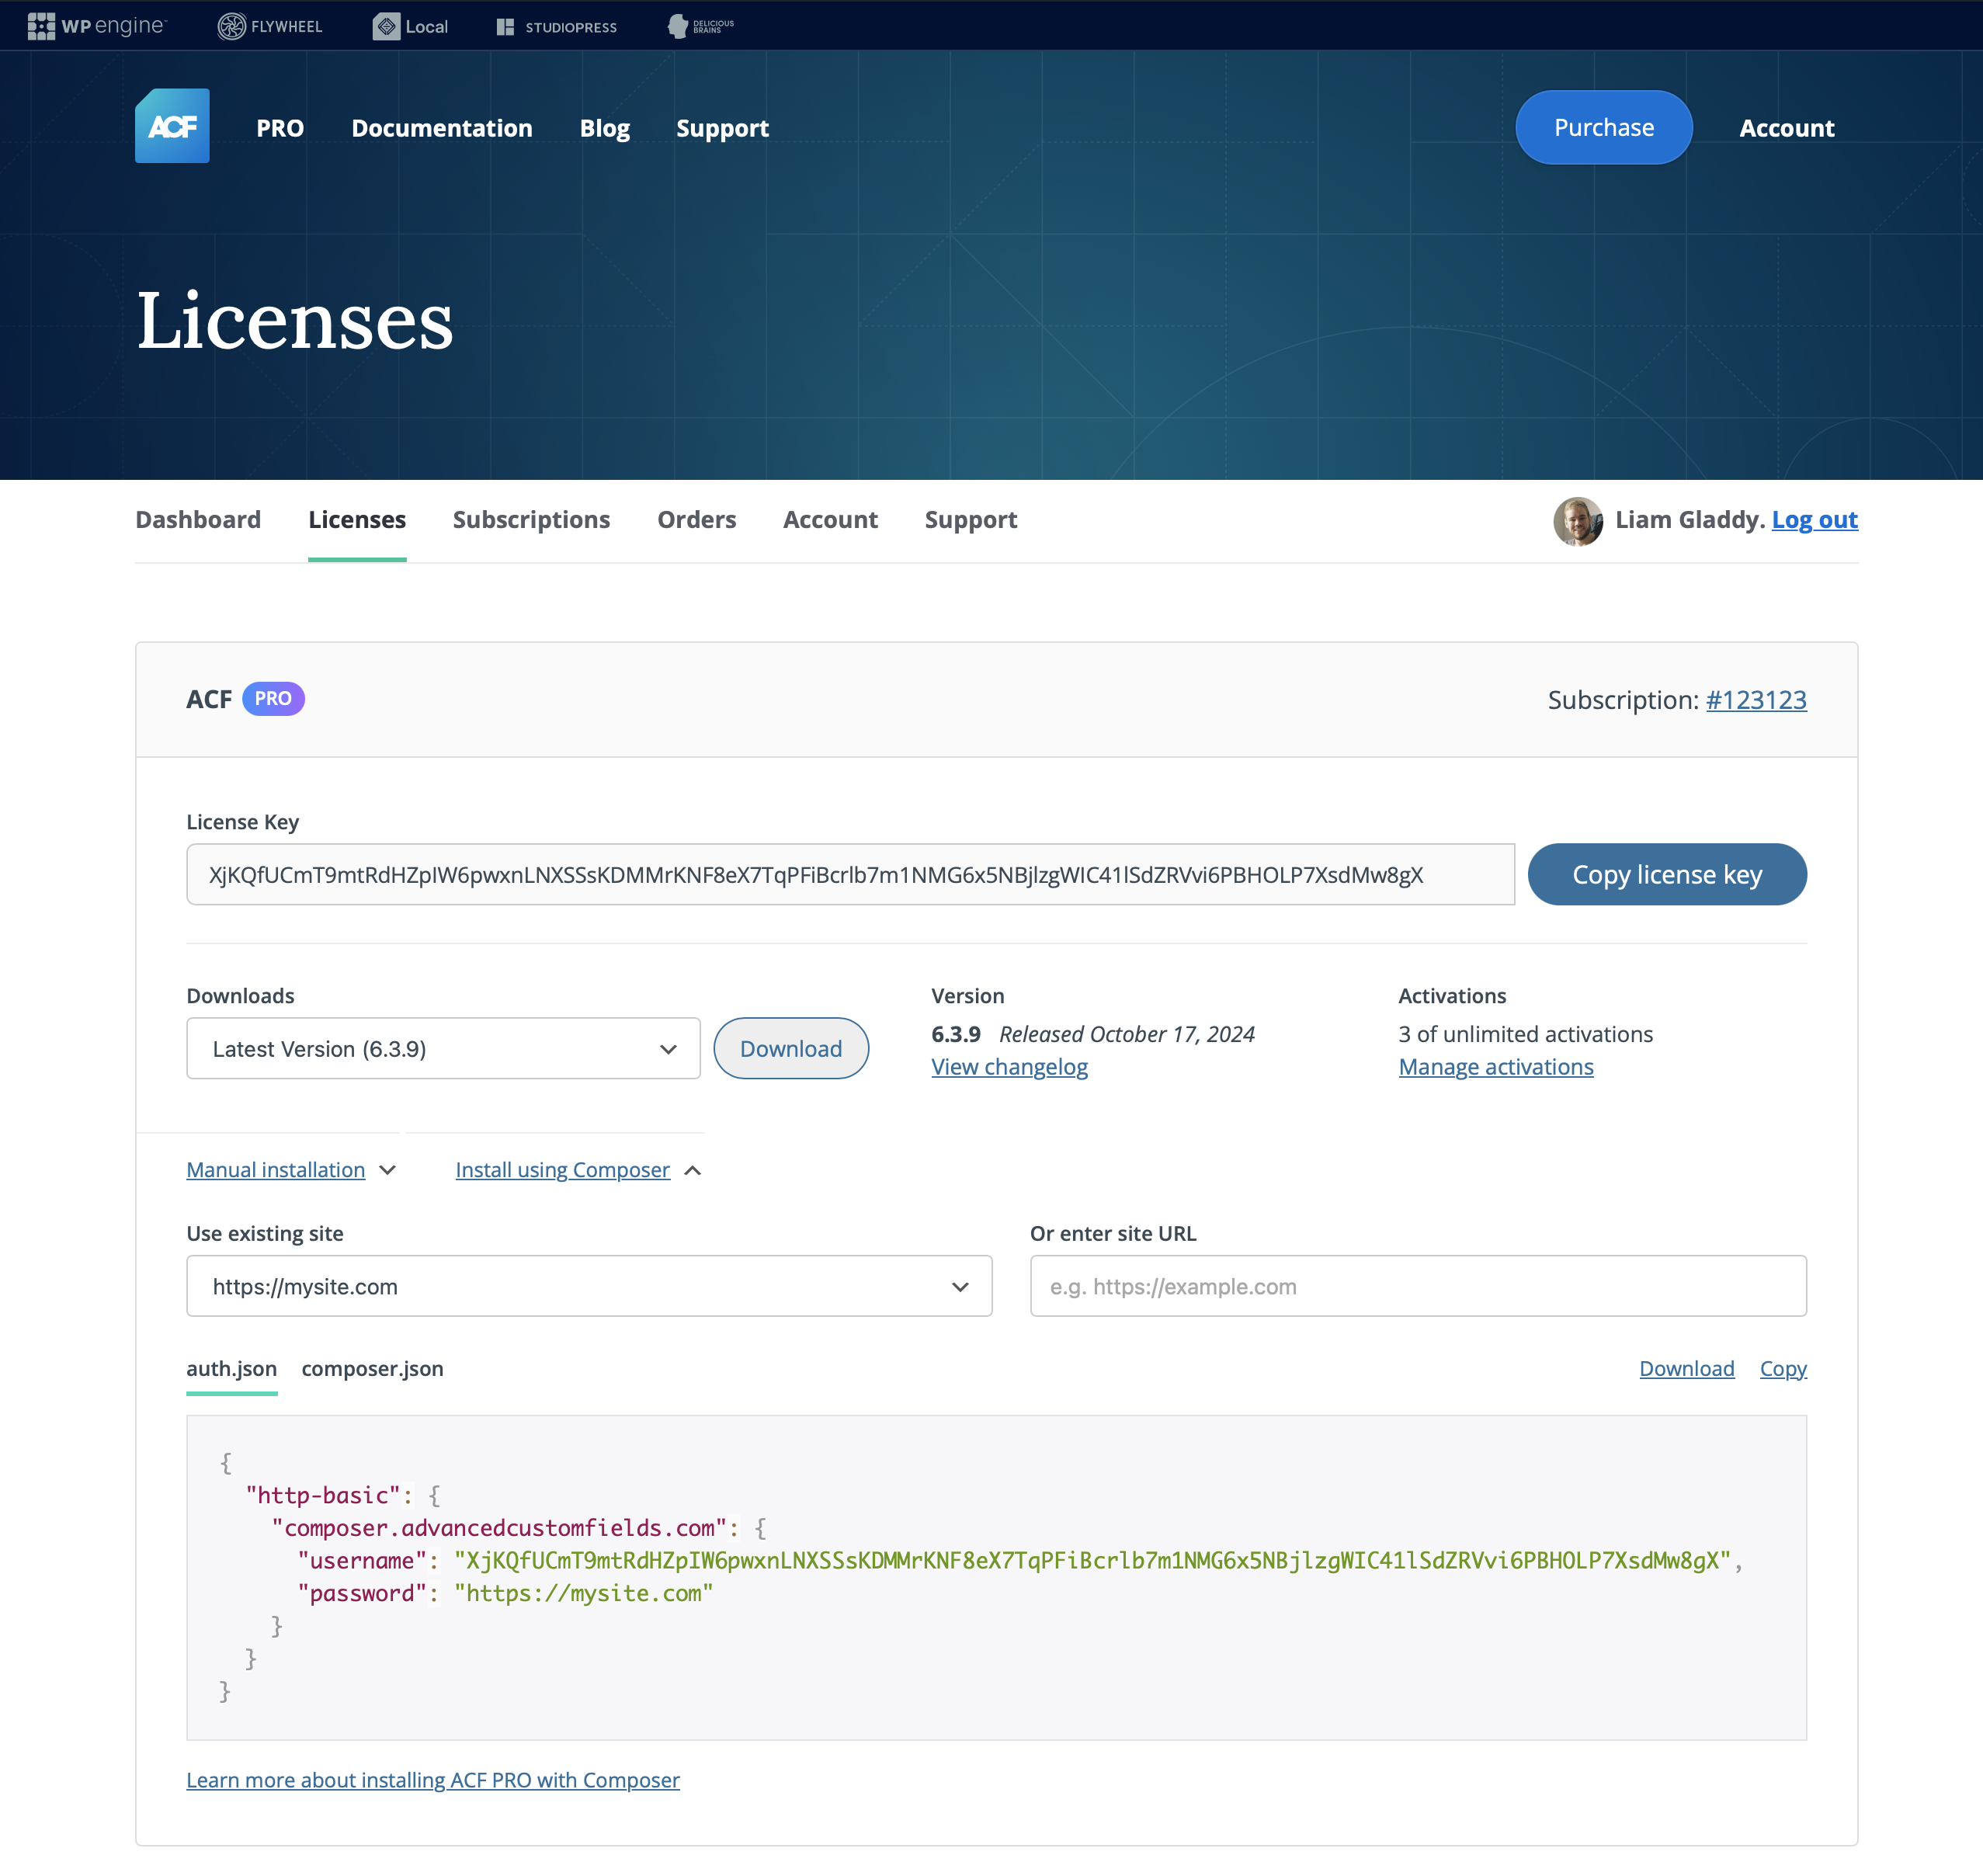
Visit My Account, navigate to the Licenses tab, and then click Install using Composer for your license.
This will reveal a panel where you can generate an auth.json credentials file to be used with Composer.

The auth.json file is made up of a username and password field. The username and password are used by Composer to authenticate to our API with HTTP basic authentication.
The username is the ACF PRO license key, and the password is the site URL (including https:// or http://) that the license is active for.
{
  "http-basic": {
    "connect.advancedcustomfields.com": {
      "username": "Dvl2P9fLovYy2oJkdYOPiCrHXcRgGrmk9WR62HdErPasPsV43COx0anwTizc9XFrY8qysqqZ",
      "password": "https://mysite.com"
    }
  }
}
The password can be an existing site that is already active for the license key, and there’s a dropdown of already activated sites that can be selected and will automatically populate the ‘password’ field in the sample auth.json code. Alternatively, you can enter a new site URL in the textbox on the right to populate the auth.json. This site URL will be activated for the license in your account upon Composer installation. Any activation of a new URL will be subject to the activation limits for the license.
If you are using Composer to install your plugins in an automated way for new builds where you don’t know the final site URL, we recommend using an existing production URL that has been activated for the license key.
We also recommend that you define your license key in code. Otherwise, you’ll have to activate ACF PRO on each site by manually entering the license key in the ‘Updates’ page of ACF’s admin. You’ll be unable to use the PRO features of ACF until a license key has been entered, either programmatically or manually.
Using Version Control
If you are using a version control system for your site, we recommend you add the auth.json file to your ignore file, e.g., .gitignore. This prevents the license key from being included in the repository.
Create the .gitignore file in the root of your local Git, if you don’t already have one:
touch .gitignore
Next, add a rule to ignore the auth.json file:
# Exclude auth.json from Git repo
auth.json
Make sure you create the auth.json file on the live server when you deploy your site if you’ve included it in your .gitignore.
Developers working with the site locally will also have to create the auth.json file and add the license key to it before running the Composer install command.
Add Our Repository
Add our repository to your composer.json file:
"repositories": [
    {
        "type":"composer",
        "url":"https://connect.advancedcustomfields.com"
    }
]
Install the Plugin
From the CLI, require ACF PRO using the following command:
composer require wpengine/advanced-custom-fields-pro
Version Constraints
You can use any Composer version constraints, or specify the exact version of the plugin:
"require": {
    "wpengine/advanced-custom-fields-pro": "6.3.1.2"
}
Customizing Install Locations
We use composer/installers to automatically install our plugin package to wp-content/plugins/. However, you can customize the install location by adding the following to your composer.json file:
"extra": {
    "installer-paths": {
        "wp-content/plugins/{$name}/": ["type:wordpress-plugin"]
    }
}
Installing as an MU Plugin
If you prefer to install ACF PRO as a must use plugin (mu-plugin), to ensure it will always be loaded by WordPress and can’t be deactivated from the admin dashboard like a normal plugin, you can alter the install location by adding the following to your composer.json file:
"extra": {
    "installer-paths": {
        "wp-content/mu-plugins/{$name}/": ["wpengine/advanced-custom-fields-pro"]
    }
}
However, plugin directories inside the mu-plugin directory will not be loaded automatically by WordPress, so you would need to require it manually with an acf.php file in the mu-plugin directory root:
<?php
require_once WPMU_PLUGIN_DIR . '/advanced-custom-fields-pro/acf.php';
As an alternative, there is a package that automatically handles loading directories in the mu-plugin directory.
Example composer.json
{
    "name": "wpengine/composer-test.dev",
    "description": "ACF PRO in a WordPress site",
    "repositories": [
        {
            "type":"composer",
            "url":"https://connect.advancedcustomfields.com"
        }
    ],
    "require": {
        "wpengine/advanced-custom-fields-pro": "^6.0",
    }
}
Build Systems and Environment Variables
Instead of auth.json, you can provide the basic authentication via the COMPOSER_AUTH environment variable if your deployment system does not support adding files pre-build. This should be a json encoded string matching the pattern below:
export COMPOSER_AUTH='{"http-basic": {"connect.advancedcustomfields.com": {"username": "Dvl2P9fLovYy2oJkdYOPiCrHXcRgGrmk9WR62HdErPasPsV43COx0anwTizc9XFrY8qysqqZ", "password": "https://mysite.com"}}}'
If you are using Roots Trellis for deployments, you can make use of the Composer HTTP Basic Authentication feature supported by your Ansible vault.
Troubleshooting
Error codes from Composer downloads match the HTTP standard. For example, 400 means you’ve requested an invalid version, 401 means you’ve provided an invalid license key or site URL, and 402 means your license has no sites left or has expired.
Supercharge Your Website With Premium Features Using ACF PRO
Speed up your workflow and unlock features to better develop websites using ACF Blocks and Options Pages, with the Flexible Content, Repeater, Clone, Gallery Fields & More.
Related
- Getting Started: Installing ACF With Composer
- Getting Started: Installing the Free ACF Plugin
- Guides: How to Activate ACF PRO
- Videos: Installing ACF and ACF PRO
- Guides: Upgrade Guide – Version 4

